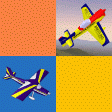
Tip #1 -
Create your own design for a truly unique paint scheme
When designing a paint scheme on the PC, the program must be able to change colors on
different parts of the model. Also, there has to be a way to draw lines, stripes,
stars, circles, etc. in order to create interesting and colorful paint scheme designs.
With MACD, changing colors is easy. First, open Paint Booth and press the Color button.
A color palette window will pop up where you can select any color you want.
After selecting a color, click on the bitmap image located to the right of the 3D-model.
This changes the color on the bitmap to the new color you have selected. The 3D-model
simultaneously reflects the same color change. That's how simple it is to change any color on
the airplane.
Obviously, you want to create your own paint scheme design. A design that will be
different from the ones included in the program. This will require you to use a separate
paint program. Any paint program you're familiar with will do. Or. you can use Windows
own Paint program which is free and easy to use. If you have little or no experience
with a paint program, we have a Paint tutorial
with step-by-step instructions on how to draw an aircraft paint scheme. Once you have drawn
your design with the paint program, save it. Then, load your paint scheme into the
MACD program. The 3D-model airplane in MACD will be covered with the design that you drew
with the paint program. That's it. That's how easy it is to create a custom paint scheme
design with MACD. More details about modifying and saving bitmaps can be found in the
program's Help file for the Paint Booth window.
Tip #2 -
Side-by-side comparison of two different color schemes
When you have to decide between two color schemes it's best to view them side-by-side.
Our MACD Version 2 programs make this very easy. Start the program and select "View Model" on
the Function Menu (screen left side). Then select "2x Aircraft". You now have two airplanes on
the screen. You can load one paint scheme on Plane #1 and load a different paint
scheme on Plane #2. If you want to change colors on either airplane, simply
open Paint Booth, change colors and go back to the Side by Side screen. You can rotate
both airplanes to view them in any attitude you choose. Also, they can be flown together,
side-by-side, in the flight simulator. This is a great way to help you decide which will be
your final paint scheme design.
Tip #3 -
Background Image
As you probably discovered already, the background image can be turned on and off with the top menu
option "View / Background". But you may not know that the background can be changed to just
about any picture that has a ".bmp" extension. This could be a picture of your backyard or
the field where you fly or just a solid color. The following is the procedure
for changing the background. Rename the file "bkgimg.bmp" to "bkgimg-old.bmp" in the MACD
folder. Note that the background image needs to be in the Windows bitmap format (.bmp extension).
Then rename the new bitmap file from whatever it is to "bkgimg.bmp". Make sure
the file is located in the MACD folder. Start the program and now you have a new background.
Here are a couple of backgrounds you may want to try. Click on the image you want and it will
appear in a new browser tab. From there, you can right click to save the image.

Background 1
Background 2
Tip #4 -
New features in this current version of the program.
The new version features 5 different airplanes. Select the airplane you want to
work with and start creating your custom paint scheme design.
In the new version there is an innovative Function Menu for selecting different display
options and for navigation to other parts of the program. This replaces the previous
Novice/Expert modes. A new user interface has bigger text and buttons that are easier
to see on wide screen desktop PC's and also for the smaller laptop and tablet screens.
Keyboard Function keys allow quick access to different functions. For example, press "F3"
to access the Paint Booth screen, and "F10" switches to the Side-by-Side View screen.
The color of the spinner, wheel pants and landing gear struts can be easily changed by
the user. Also, access to the control panel has been improved. Right click anywhere inside
the program window and control panel pops up saving precious time. Another feature is for
when you're in Paint Booth or View Model window. Press the space bar to start rotating the
model, then press it again to stop rotation. MACD is able to run in 32 bit color mode which
allows the user to choose from the greatest number of colors that can be displayed on the monitor
to design your paint scheme. That's right, MACD keeps improving with every new version .
Tip #5 -
Printing the finished model.
This is not a feature of MACD yet, but it's in the works. In the meantime, it is possible
to print the screen image. From the MACD program, you hold down the ALT key and press
the Print Screen key. Both keys must be down at the same time. This will send the current
MACD screen image to computer memory. Now we need to start the Windows Paint program by
clicking on Start/Programs/Accessories/Paint. From Paint, select Paste from the Edit menu.
The MACD screen should come up inside the Paint program window. You may print it now by
selecting Print from the File menu.
Tip #6 -
Games and 3D applications run poorly on Windows Vista
Here is a tip for Windows Vista users. If your PC is running slow after installing
Windows Vista, there is some good news. We have found that the reason games and other
3D applications run poorly on a large number of Vista machines is the Aero interface.
Aero uses up a lot of resources leaving 3D applications little to work with.
The solution is to turn Aero off, but not permanently. There is a way to turn Aero off
only when the 3D application is running. When you quit the 3D application, Aero comes
back on automatically.
The procedure to turn off Aero for a particular application is as follows:
1. Find your application's shortcut icon, either on the Start Menu or on the desktop.
2. Right click on the shortcut icon. Select "Properties" from the list.
3. Click on the "Compatibility" tab.
4. Put check marks on "Disable Visual Themes", "Disable desktop composition", and
"Disable display scaling on high DPI settings".
5. Click "Apply" and then click "OK".
6. That's it. Next time you start your 3D application it should run almost as good as on Windows XP.
Tip #7 -.
Using Windows Paint program
The Paint program included in Windows was very simple to use until a new version was introduced in
Win 7. The new layout of the tools and the palette is very confusing for some of us. If you need some
help using this new Paint program, we have a Paint tutorial for you.
It will show you, with step-by-step instructions, how to use the tools in Windows Paint to draw an aircraft paint scheme.
Feel free to Contact Us
We're here to help with any questions you may have about MACD. We also welcome any suggestions for improving
our software. Please feel free to send an email to: wbusto@airplanecolor.com
These are all the tips I have for now. I will be adding more tips and tricks as time permits,
so you may want to check this page often. William Busto
|