
Tutorial : How to Draw an Aircraft Paint Scheme
|
 |
In Part 2 of this tutorial we began to draw, keeping everything simple. With step-by-step instructions we drew
straight lines, a red color stripe, and also a curve. In Part 3, we'll use those graphic elements to acquire
more drawing experience.
We're using Microsoft Paint in this tutorial, but the same techniques learned here can be utilized when
drawing with any other paint program.
|
|
|
|
PART 3: INTERMEDIATE DRAWING
|
We're going to use our MACD program's Cap 232 right wing image that we used in Part 2. If you want to follow along,
here's how to load the right wing image in MS Paint:
1. Right click here and select Save Target As... Then save it to the Desktop.
It's easier to find it there.
2. In MS Paint, click File / Open. Navigate to the Desktop, select TESTRWT.bmp and click the Open button.
3. You should now have the right wing image in the Drawing area of MS Paint.
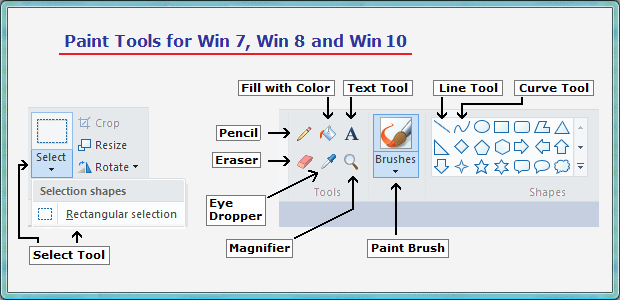
NOTE: For Windows 7 and later we have a Paint Tool Locations graphic down below.
|
 |
Drawing a Checkerboard Pattern : Click on the Line tool to activate it.
Bring the cursor over the wing, place it close to the wing tip and draw the 1st vertical line.
Draw the 2nd, 3rd, and 4th vertical lines, evenly spaced apart. It doesn't have to be perfect, just do your best.
Now let's draw 3 horizontal lines, as shown above. Select a red color then click on the Fill with Color tool.
Now click on every other square to paint them red. And that's how you draw a checkerboard pattern.
|
Making Corrections : If we make a mistake while drawing, the quick fix is going to the top menu
and click Edit / Undo. Then make your drawing again. However, there are times when this is not possible.
In the Chekerboard Pattern we drew above, a few corrections could help clean it up. Edit / Undo
wouldn't work now, so let's do it with the Magnifier tool and the Eraser tool. Click on the Magnifier
tool to activate it.
|
|
In Win 7 and later, we have the same tools, same icons, but at different locations.
|
 |
Drawing a Star : Stars look very cool on an airplane, and they're easy to draw. See below.
The first three lines are important because they define where the points of the star will be. The last two
lines serve to connect everything together.
If the star doesn't come out right the first time, go to the top menu and click Edit / Undo several times.
Then draw it again.
The next step is to clean up the lines inside the star. Use the Magnifier tool to zoom in and then
use the Eraser tool to delete the lines inside.
Let's fill the space inside the star with color. Click on the Fill with Color tool.
Now click on the orange box in the Color Palette. Then click inside the star to paint it.
|
|
 |
Adding Text : Click on the Text tool to activate it. It's located on the fifth row, right
side. Now click on the dark gray box in the Color Palette.
Press and hold the left mouse button, then drag the Text pointer from top left to bottom right side of the
wing to create a dotted line rectangle. Release the mouse button. See below.
The area inside the dotted lines is where the text will be added. Now, look for the Text Toolbar.
We are selecting Font Size 18 and Bold Text (B) on the Text Toolbar. See below.

Click inside the dotted line rectangle. There should be a blinking cursor within the rectangle. Let's
type CAP 232, then click outside the rectangle. You should see our text on the wing now.
|
For this design, we need to draw three curves, grey, black and red, or any color combination you prefer.
|
Fuselage Graphics : Drawing fuselage graphics is pretty much the same as drawing wing graphics.
To create a design like the one on the left, we have to draw three curves.
Click on the Curve tool to activate it. It's located on the sixth row, right side. Now click
on the red box in the Color Palette.
Press and hold the left mouse button then drag the cursor from left side to right side
of the fuselage. Release the mouse button. See below.
Now draw two more curves, using different colors. When you finish, you should have 3 curves similar to
the image on the left.
Let's fill the space between the lines with color. Click on the Fill with Color tool to activate it.
Choose a color from the palette and click between the lines.
After painting the fuselage with the 3 colors, our graphic design is completed.
|
Drawing Aircraft Paint Schemes :
Here are two examples of paint schemes created
with the skills we have learned so far.
|
This paint scheme was created mostly with straight lines. This would be a good first paint scheme drawing
exercise.
|
This paint scheme was created using straight lines, curves, stars and checkerboard patterns.
See how this is done in Part 4: Tips and Tricks.
|
END OF "PART 3: Intermediate Drawing"
In this lesson we learned to draw checkerboard patterns, stars, how to add text to our
paint scheme design, and how to draw curves on a fuselage. These are common graphic elements in aircraft
paint scheme designs.
The next step is "PART 4: Tips and Tricks".
|
© Copyright 1998-2019, Model Airplane Color Design. All Rights Reserved.
All trademarks are trademarks of their respective owners.
|