|
|
|
PART 4: TIPS AND TRICKS
|
How to draw an Aircraft Paint Scheme :
Drawing an aircraft paint scheme is not hard if you know a few simple tricks. The image below is the finished
paint scheme of an RV-7 model's right wing. The following step-by-step instructions will show you how to do this.
Important Note: While this may not be the paint scheme of your dreams, it's important to see the
techniques used here to move graphic elements around. You will find that it's easier to move a graphic element than
to erase and draw it again.
|

|
Step #1 :
Let's draw a couple of lines on this RV-7 Model right wing image (Note: you can download the image here).
Draw one line straight across the top of the wing.
Draw another line at an angle inside the wing outline. See below.

|
Step #2 :
Select a red color from the Color Palette, then click on the Fill with Color tool.
Now click on the top and on the left side of the wing to paint them red. See below.

|
Step #3 :
Let's draw a checkerboard pattern. Our goal is to draw the checkerboard pattern on an area
down below the wing outline, then move it into position on the wing. See below.

|
Trick Alert :
Here's a trick to keep from erasing the wing outline when you move graphic elements over it. When you activate the
Select tool, you have two options, Solid and Transparent. Choose the second one. See below.

|
Step #4 :
Click on the rectangular Select Tool to activate it. Press and hold the left mouse button,
then drag the Select pointer from top left to bottom right side of the checkerboard pattern. Release the
mouse button. See below.

|
Step #5 :
Drag the dotted line rectangle up into the wing and then click outside the rectangle to finish.

|
Step #6 :
Let's draw a large star down below the wing outline (Note: To help you follow along, you
can download the following image here). See below.

|
Step #7 :
Using the Select Tool, drag the pointer to select the star. Then drag the dotted line
rectangle up and position the star next to the checkerboard pattern. Click outside the rectangle to finish.
See below.

|
Step #8 :
Now we need to draw a vertical stripe to cover the right side of the wing. See below.

|
Step #9 :
Continue drawing the checkerboard pattern all the way to the end of the wing. See below.

|
Step #10 :
It helps to have stars in different sizes pre-drawn. It's simpler to copy and paste the stars
than having to draw them over and over.
You can download the following image here.

|
Step #11 :
To finish our right wing let's add a few small stars around the top and right side of the wing.
Use the Select Tool to copy the white star and paste it six times across the wing.

|
Step #12 :
The Right Wing is done. Now let's take the right wing design, create a mirror image
and save it as the Left Wing image file. To do this:
• Go to the top menu and click on Edit / Select All.
(Win7 and later: click "Select All" on the ribbon)
• Click on Image / Rotate / Flip Horizontal.
• Now you should have a left wing image in the
Drawing area. Make a Left Wing label.
• Save this as the Left Wing image file.
|

|
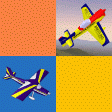
Our paint scheme is now complete :
The fuselage for the RV-7 Model was drawn in Part 3 of this
tutorial and the wing was done here in Part 4.
Here's what the complete paint scheme looks like on the
3D model.

|
Making Corrections : If we make a mistake while drawing, the quick fix is go to the top menu
and click Edit / Undo. Do it more than once, if you need to. Then make your drawing again.
How to Create a Custom Paint Scheme for MACD : This should be easier now after having acquired some
experience drawing with a paint program. The MACD High Wing Free App has an extensive help section which
includes the step-by-step instructions for creating a custom paint scheme for the
High Wing model.
This is the end of the tutorial for now. But we're not done. We're adding more Tips and Tricks
as time permits, so you may want to check this page often. Also, if you have any questions, suggestions
or comments about this tutorial, please send us an email.
|